Tuesday, March 23, 2010

Finally!

Well, here it is! My 2009 Hyundai Santa Fe. Last night we went to pick up my "new to me" car. Sorry, Kelly, didn't end up being the Ford Escape. However, I LOVE my new vehicle. Eric just got a new Hyundai Tuscon, so I figured it was OK to get a Hyundai since he does research before he buys (if you didn't Eric, don't tell me.) Any way, take a look at my new toy below!


Now that gorgeous side view . . . .


Compared to the van, the console looks so modern. The van had a cassette player and the Santa Fe has a CD player - welcome to the 21st century. Alyssa was showing me what all the buttons do this morning. I'm not very electronically savvy. Last night I had a CD in and I couldn't figure out how to get it to eject. I told that to Alyssa this morning. She looked at the controls, pushed one button, the CD popped out, and she gave me "the look".


LOVE the fact that the volume and channel control are on the steering wheel.


There's the introduction to the latest edition to the family. I think we'll have a long and satisfying relationship (at least I really hope we do).

From me and my Santa Fe, have a good one!
Jill

Sunday, March 21, 2010

Built Tough

Here's a card I've been working on for a couple of months. Almost all of it is copied from something I saw on someone else's site. Since I should really give credit where credit it due, I'd love to give you the link. However, I found the card before I knew I was going to start this blog, so I didn't copy down the address. So whomever designed this card, I think you did an awesome job and thank you!

I try to tailor make my cards for the person I'm giving it to. My nephew, Ben, LOVES vehicles - any type of vehicle. He's also a little "tough guy" in a sweet type of way.


On top of all the layers, I also popped up the gears.


Also popped up the gears in the inside of the card.


The funny part about my making this card is that his birthday isn't until August! However, this was the perfect card, so I had to go ahead and make it.

Next I hope to working on Easter stuff. Hope you'll come back and check it out.

Jill

Monday, March 15, 2010

Spring!

How do I know that spring is trying to spread into the frigid north known as Wisconsin? The following is my list of clues.

Here's the obvious one. The thermometer reads 55 degrees. It's March 15 - 55 degrees on March 15th in Wisconsin is something dreams are made of.


What is that white stuff on the grass in the yard? The weatherman on channel 5 called it yard mold this morning. That sounds pretty disgusting. I'll just count it as another sign spring is on it's way.


You can almost see the leaves popping out of this rose leaf bud, can't you?


Here's our water skiing lake in the backyard. Problem is, it shows up too early and is too cold to actually go water skiing on. When it's warm enough, the lake is gone.


Beautiful daffodils. They are such a happy looking flower. You can't see them, yet, but they are on their way!


The birdlike columbine are peaking their leaves out. I'm partial to purple and dark red leaves on plants. This one is making me happy in March!


I planted a cherry tree about four years ago. Haven't gotten a cherry, yet (the birds have). But the blossoms are gorgeous in a couple of months. I know they're coming because of the buds that are getting bigger by the second.


The bottom of the rose canes are getting green. I should have cut the dead parts out several weeks ago. But it was COLD outside. Fat chance that was going to happen.


But the number one reason I know spring is on its way???? I was outside without a winter coat taking pictures of my garden! Mellie was with me enjoying the warm air and trying to miss the puddles (yeah, right). I know we'll probably get more snow, but I'm going to enjoy the weather outside while I can.

Happy Spring!
Jill

Saturday, March 13, 2010

Busy Week

Well, it's been almost a week since I added an entry to my blog. We've decided to buy a different vehicle. We sold the van, so I need something else to drive. All week we've been going to different dealerships to try and figure out what to get. I've already decided I don't want to drive another minivan. I want something a little more sporty, but I don't want a regular car. I like that the van sits higher - lends itself to better visibility and it's much easier to get into. I think Don and I have it narrowed down to a Ford Escape or a Hyundai Santa Fe. My brother and sister-in-law, Eric and Michele, just bought a Hyundai Tucson which they seem fairly happy with. I'm not sure I would have considered a Hyundai without knowing someone else that had purchased one first. Guess I don't like being the guinea pig. Any way, we're going out again today to see if we can find "the one". I'm very partial to dark blue, so hopefully we'll find that color with all the features we want. The other kicker is we have to find it in a used vehicle. Amazingly enough, we're not made out of money. Well, that's my excuse for not posting sooner and I'm sticking to it.

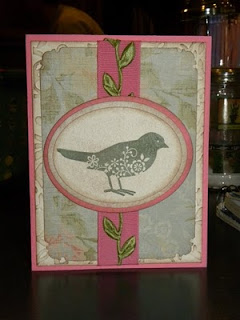
The other thing I've procrastinated on is thank you notes for some gifts I got for my birthday last week. Got those done this morning so they are the pictures for my post today. The first one is a reflection of my own personal taste. I love the soft feminine look of it. When I saw the paper I instantly wanted to buy it. Had no idea what I would use it for, but new it wouldn't take long to think of something.


I also try and make a card suit the person I'm sending it to. This next card if for a sister-in-law on my husband's side. To me she seems to be straight forward, so no sponging of the edges - or blurring of what it is. She also seems to be a happy camper so, thus, the bright colors. I put a little dimension to the card that you can see in the second picture.


Hope you got some inspiration from the cards and that your day goes well. Thanks for stopping by and taking a look. I know I only mentioned Eric once in this post, but hopefully you'll still come back to my blog.

Jill

Sunday, March 7, 2010

Game Night #2

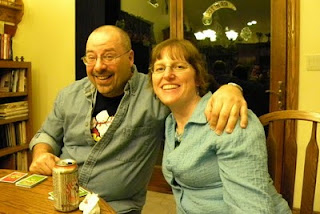
Who knew it was going to be an "Apples to Apples" marathon? It was definitely fun, though! Eric wants everyone to know that he won - by a lot. The first picture is of Eric with his wife, Michele. Michele tries to keep Eric in line. That's not easy to do . . . .


Here's my cousin Ann and her husband, Gary. She's a great Apples to Apples player. She might be good at playing other games, but I only experienced playing one game with her. Hopefully we'll have the opportunity to play other games next time. Gary seems quietly rebellious. We saw glimpses of that coming out in some of the cards he played.


Here's Don and I. Don doesn't have any problem catching you off guard with some of the things he says. I've learned giving him an elbow to the ribs doesn't help. I guess if you don't appreciate his humor you'll have to just move along.


For some reason Eric got a lot of the blank cards, both for answers and coming up with the "lead' card. He came up with "Bodily Functions" and here he is cracking up to the responses he got. I think he was actually laughing so hard he was crying.


Can't wait for next time! Hope everyone had as much fun as we did!

Saturday, March 6, 2010

Bee thankful


Well, we obviously need to mention Eric(1) in this blog. The reason I have stamps with bees is because Eric(2) introduced beekeeping to my daughter and I. To go along with making honey, making paper craft projects just naturally followed.

My Dad sent me a really cute towel and hot pad set for my birthday. The set was arranged in the shape of an angel - really cute. I made and sent this thank you card out to him.

Yes, I'm one of those matchy-matchy people. I love it when the envelope matches the card. I don't show it, but there is also a two-toned bee on the front of the envelope. The set is from http://www.papertreyink.com/. Solid colored papers are from Stampin' Up! (love their cardstock and if you're interested I know a very friendly SU! demonstrated that can set you up with an order blank). The border punch is also from SU! and a brand new introduction from them. There is also a corner punch that goes with it and is fairly easy to line up. Just didn't need it for this project.


Well, time to get my house clean. I'm having my second game night tonight. I've invited my brother Eric(3) and his wife, Michele, and also my cousin Ann and her husband Gary. I can't wait! The last game night was a blast - no pressure Eric(4). Maybe I'll post pictures tomorrow. Have a great day! (You were specifically mentioned 4 times, Eric, five times with this).

Monday, March 1, 2010

OK, Eric, this is for you.

My brother, Eric, faithfully reads my blog and is very free with the critiquing. For the most part, I agree with what he's suggesting. However, he insists that the blog would be much more interesting if I added way more tidbits about him. Not sure if that is a good idea. Let me know what you think.

Meanwhile, I think one of his suggestions of putting directions for my projects along with pictures of it IS a good idea. So here's my first attempt. He also mentioned he doesn't know how my Cricut works, so I'll explain that a little bit, too. Anything to make Eric a happy camper.

First of all we have a picture of the Cricut Expression. It is the big sister to the Cricut Personal Cutter. Instead of 6 inch by 12 inch wide paper, it uses 12 inch by 12 or 24 inch wide paper. Some of the images you can cut with the machine have small parts, so being able to cut them bigger makes it easy to assemble later. The next picture is of the cartridge. This is what gets loaded and gives the machine the info it needs to cut shapes specific to that cartridge. Then the third picture is the keyboard with the keyboard overlay on top. Each cartridge comes with it's own overlay because they all have different images to cut, but they all use the same keyboard.


Now for my project. Whenever I'm stressed I enjoy eating chocolate. We didn't have any chocolate when I got home tonight, so I thought I'd made some instead. Still didn't make me feel better, but the project turned out OK. I ended up having red licorice instead. The project is a triangular box that looks like a piece of chocolate layer cake - yum! This cut is on the Tags, Bags, Boxes, and More cartridge. It would be a cute box to put a small birthday surprise in (like chocolate!).


The expression has a key that is called fit to page. If this is chosen, the size of the image is the biggest size that will fit onto the size paper mat chosen. My project ended up being 9 inches (when laid out flat, not the completed piece of cake). After cutting that out I scored the fold lines. Scoring in making an indent in the paper so that it folds straight with a nice crease. Makes for a much neater project. The picture shows a paper cutter/scorer that I use. I have the score tool in it, not the paper cutter. It comes with both tools.


What's chocolate cake without frosting, right? I measured the back flap so that I would know what size to cut the frosting. For my size box I cut a piece of white at a strong 3 1/2 inches x 3 1/2 inches. This gives enough to fold over the top and punch the scallops.


Since you use a spatula to put the the frosting on, I used the Cuttlebug folder D'Vine Swirls to emboss the white paper to look like I swirled the frosting on. For a little extra frosting look, I used Stampin'Ups! border punch Scallop Edge.


Since paper frosting doesn't stick to cake very well, I put tape on the back flap of the cake box and stuck the frosting to it. To get the frosting on the top of the box to be at the same angle as the box, I folded the box flat on one side and carefully cut the frosting using the edge of the box as a guide. The did the same thing on the other side. Once that is cut, I taped that down to the top of the cake box.


Since you don't want the box to fall apart if you put something inside it, use some strong two-sided tape on the cake tip and long edge flaps like you see in the picture. Don't put any tape on the flap edges unless you don't want to put anything inside the box - at which time I ask, "Why are you making this gift box if you don't intend to put anything inside it?"


Now it's time for the sprinkles. I used some scrap paper in various colors and used the Stampin' Up! Horizontal Slot punch. Then I just glued those on haphazardly as it they were sprinkles out of a bottle.


Now for the best part of the chocolate cake - the frosting between the layers! I cut two pieces of white paper 1 1/2 inches by 5 1/2 inches. I used Martha Stewart's Dripping Goo on one edge of both pieces. I then used my paper cutter to cut them down for an overall width of 3/4 inch from straight edge to the bottom of the dripping frosting. In the first picture you'll notice I put a small bend in one end of the first piece. This bend will fit around the front tip of the piece of cake so that there isn't an area where you can see brown cake at the tip after gluing both pieces onto the sides. Then I glued the first piece of white onto the side. There was a little extra of the strip that was at the back flap. This piece is shown in the next picture. I wrapped that around to the inside of the box so that it looked more finished. Then do the same thing to the other side of the box.


. . . and the completed cake box once again.


Hope you enjoyed baking with me. No calories, but the real thing would be better. I'm sure Rosie would agree since no one is more addicted to chocolate than her!

Yeah, March 1st - that much closer to spring and no snow.
Jill